It can take a long time to get your development machine just right, to get just the tools you need and nothing more. It’s usually the point in time just before things start to become flaky - you know, when your wi-fi doesn’t always connect properly or you start having issues connecting to a projector for no apparent reason. Even if this doesn’t happen, give it a year and Windows will just start to feel slow.
I recently had the SSD drive on my laptop die, which resulted in a new SSD and a complete rebuild. I have to say that it seems a lot faster now, but I was gutted that I had to start again at setting my machine up. I realised I had created a snowflake developer machine, something we never want to do with our servers. With servers we want to have our infrastructure as code, so why wouldn’t we do the same with our developer machines?
The objective is to be able to rebuild my machine from scratch at any point without losing my configuration. To be able to test this I first needed a way to rebuild windows quickly.
So in this blog post I am going to explore a few techniques I’ve recently discovered to boot a new installation of Windows.
Boot to VHD File in Windows
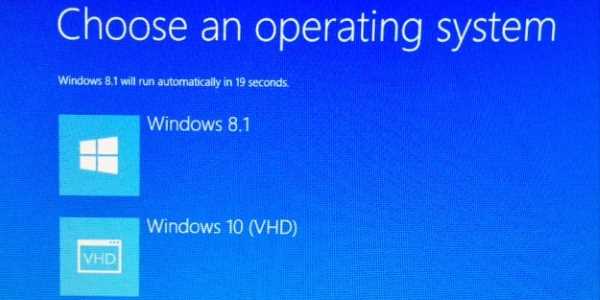
Having multiple boot options is now easy, you no longer need to manage drive partitions and install windows from scratch. You can now simply create a virtual hard drive file (.vhd or .vhdx) and add it as a boot option.
So far I’ve found two ways to do this:
- Download windows as a .VHD file
- Download windows as an .ISO file and then install it into a .VHD file using PowerShell.
Either way you will end up with a vhd file containing Windows. You then need to use a command line tool called BCDEdit to manage your boot options and tell Windows to boot to this file. There is a small risk when changing your boot options that you could get something wrong, so the first thing to do is to back up your boot configuration.
Backing Up Your Boot Configuration Before We Begin
To back up your boot configuration open an elevated command prompt (WIN+X, A) and then type the following:
bcdedit /export c:\bcdbackupTo restore this file you can simply run.
bcdedit /import c:\bcdbackupA note About BitLocker Encrypted Drives
To boot from a virtual hard disk (VHD) file, Windows must have access to the file at boot time. If the file is stored on a BitLocker encrypted drive this will not work. You will just see a blue screen of death when trying to start Windows. (It took me a while to figure this out).
So in my case I first had to turn off BitLocker, partition my drive so that I had a D: for storing just the VHD files and then re-enable BitLocker on my C drive.
Option 1: Download windows as a .vhd file
If you are an MSDN subscriber it is possible to download operating systems as VHD files. This makes the process much simpler. All you need to do is download the file and store it somewhere sensible. (Not on a BitLocker drive)
Once you have the VHD file somewhere, simply issue the following commands:
bcdedit /copy {current} /d "Windows 10 (VHD) Or Some Description Here"This first line makes a copy of the currently running OS and duplicates it with a new name. The command will return a new identifier (CLSID) as a GUID in curly braces. You need to copy this long identifier (including the braces) and use it in the following 3 commands: (leave the square brackets on the drive letters too)
bcdedit /set {IDENTIFIER} device vhd=[D:]\Win10\<VHD file name inc extension>
bcdedit /set {IDENTIFIER} osdevice vhd=[D:]\Win10\<VHD file name inc extension>
bcdedit /set {IDENTIFIER} detecthal on
Because we copied the entry, we need to change the location to point to our new VHD file, which is achieved with the first 2 lines. The third detect hal command is needed if you are switching between physical and virtual images.
Option 2: Download windows ISO and install into VHD file using PowerShell.
If you have Windows as an ISO image then the easiest way to install this into a VHD file is using this clever PowerShell script.
Note: I did find a few problems when running the script dated 19/6/2015 and had to fix up my own version.
I chose to use the GUI option, which will appear if you run my version of the script in the PowerShell ISE. The script will mount the ISO and create and mount a VHD drive and then copy all of the necessary files from the ISO image into the VHD. I used a fantastic guide to this process to help me.
Once the VHD file is created, you need to first create boot files on the drive using the following command:
bcdboot M:\WindowsThis will have also added the boot record, so to see it just type:
bcdedit /vThis will list all boot options. Look in the list for a new entry where the OSDEVICE points to your new VHD file path. Using the identifier (which is a GUID wrapped in curly braces) you can then modify this record if needed.
Managing Boot Entries with BCD Edit
I found the following commands to be useful:
REM List all boot entries
bcdedit /v

REM Change the description of an entry
bcdedit /set {IDENTIFIER} description “Windows 10 (VHD)”

REM Move an entry to the end of the list (they seem to default to the top)
bcdedit /displayorder {IDENTIFIER} /addlast

REM Delete an entry that you no longer need
bcdedit /delete {xxxxxxxx-xxxx-xxxx-xxxx-xxxxxxxxxxxx}
Finally, if you want to change the default boot option you can do so by changing the computer startup settings dropdown. To find it go to:
Computer properties –> Advanced System Settings –> Advanced –>Startup and Recovery (Settings button) -> Default Operating System.
Summary
In this post we explored techniques to setup new installation of Windows and add them as start up boot options. This allows you to easily add and remove new environments as and when you need them. Be that a new custom configuration for a new project or just to try out some evaluation software without trashing your prized development machine.
The good news is that the VHD’s we’ve created can also be run as a virtual machine using VirtualBox. (I haven’t tried Hyper-V)
In the next post I intend to build on this topic and show how I am installing all of the software that I need using a PowerShell script.
As always, let me know your thoughts in the comments.