We use TeamCity to build all of our projects, so the first thing I wanted to do when starting out with Xamarin was create a solid build pipeline for our mobile apps.
Ideally when working with Xamarin you want exactly the same flexibility we have got used to when building websites, namely:
- As soon as code is checked into Team Foundation Server (TFS) a build is kicked off.
- As part of this build process all unit and integration tests are run. If a test fails the build fails and the team is notified either by email or via a dashboard.
- Allow a tester to publish any successful build to a testing environment.
- Allow any build that passes testing to be pushed out, live to the world, at any time.
So over the last few evenings I have been attempting to get a build up and running by connecting a build server running TeamCity to a mac mini which has Xamarin installed.
In this post I will run through the initial steps needed to build an .ipa file:
- Install Eclipse and Team Foundation Everywhere to allow us to get the latest code from source control
- Install the TeamCity build agent on the mac
- Create a build script to compile the code
- Configure a TeamCity build step to run our script
In a follow up post we will build our Android project, run the tests and then publish the build the build to a test environment.
Step 1: Getting the latest source code from TFS
I have to admit that using Team Foundation Server on a mac is slightly painful compared with Git, but it’s definitely possible. If you are actually going to be developing on the mac I would recommend using Git via SourceTree (or just Git in the terminal if you are familiar with the commands) but if you are primarily working in Visual Studio and like in our case use TFS for other projects then it is a decent choice.
To use TFS on a mac you will need to do the following:
- Install Eclipse
- Install Team Explorer Everywhere
- Map a local folder to the project using the Eclipse IDE.
At this point you should have the source code locally which you could build with Xamarin Studio if needed. We will automate getting latest in our build script later.
Step 2: Installing the TeamCity build agent
The next step is to connect the mac to TeamCity so that it can detect changes to source code in TFS and then trigger a build on the mac to compile the iOS project. To do this we need to install an agent on the mac.
Note: I am assuming that you already have a TeamCity portal up and running, if this is not the case then see the documentation for a guide to setting up TC.
Installing the agent is a fairly manual process, luckily there is a great guide in the teamcity documentation, however before starting I would add the following tips:
- Pay attention to the section titled Using Launch Daemons Startup Files on Mac OSx. Read the externally linked page carefully as this is important to make sure the agent will start up after the mac is rebooted. You can test how the startup will work by executing sudo launchctl load jetbrains.teamcity.BuildAgent.plist
- To change the file permissions open the folder in Finder and then right click and select file info. Then under permissions if you click the padlock sign it will allow you to change the permissions type drop down next to each group or user.
- You will need to authorize the agent in teamcity.
- To temporarily stop the agent you can run sh buildAgent/bin/mac.launchd.sh stop kill, don’t execute the final step (no. 6) sh buildAgent/bin/mac.launchd.sh unload as this will stop the agent running after a reboot too.
- I had to change the port number in the config from 9090 to 9091 but i’ve no idea why. It initially connected but when I went into the agent properties in teamcity it showed the port number as 9091. Then at some point it showing as online and I found by changing the port in the config to the same number it started connecting again.
Hopefully you now have an agent running which shows up in the list of agents in teamcity, even after a reboot.
Step 3: Creating a build script
Now that we have all of the pieces in place we can create a build script to compile our iOS app. There are several ways to go about this, I chose to create a mac build script that would run in the Terminal for several reasons:
- Because I am using TFS for source control, the TC agent isn’t able to get the latest source code onto the mac, so I needed to do this at the command line anyway.
- Although TeamCity recognised Mono as being available to the build agent, I couldn’t get Mono to compile my iOS Xamarin project and instead found that XXXX worked well. This is the same command that Xamarin Studio uses.
- I generally prefer to have a build script which can be put into source control and run locally on a machine instead of having all of the build steps within TeamCity configuration. That way if the build server dies the build process is safe in source control where it should be. (I know what you are thinking, but If source control dies we are all doomed anyway!)
I will talk you through the script step by step:
Debug Info: Print as much useful debug information as possible, trust me you will need it at some point.
echo "running from directory:"
pwd
echo "Running as user:"
whoami
echo “current PATH”
echo $PATH
Get Latest: Make sure we have the latest source code on the machine
# Get the latest source code for the current folder
echo “Get latest from TFS”
/Users/MyPathToBuildToolsHere/TEE/tf Get -R .
Nuget Restore: Download the nuget packages if needed. Although this should happen automatically if package restore is enabled I had lots of problems with this and had to solve this manually. (Thanks to this post for the answer). However it would be worth trying without this step as this is something that I’m sure will be fixed in the future.
# NUGET
echo “Sort out nuget packages”
cd .nuget/
# Sync certificates - needed for .nuget restore
mozroots --import --sync
# Nuget restore of packages
mono --runtime=v4.0.30319 NuGet.exe install ../PathToMyProjectFolder/packages.config -Output ../packages
cd ..
Build Time: Building our project
echo “Building the app!”
/Applications/Xamarin\ Studio.app/Contents/MacOS/mdtool -v build “—configuration:Ad-Hoc\|iPhone” MySolution.sln -p:MyiOSProjectName
Put all of these steps in a file called BuildScript.sh. This can then be tested by executing the following at a terminal window:
sh BuildScript.shThis should result in the project being built and a .ipa file being produced.
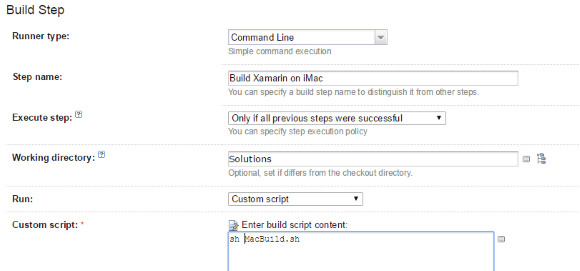
Step 4: Configuring TeamCity Build Steps
Now that we have a build script, we just need to configure TeamCity to run our build script.
To do this add a Command Line build step and execute the build script using the sh BuildScript.sh command above.
The final thing we need to do is configure the location of the resulting .ipa file in the build artifacts in TeamCity. This will mean that TC stores the .ipa file on the server, allowing you to use it in subsequent build steps if required or download it later if needed.